REDCap Project Modifications in Production Status
REDCap users are strongly encouraged to utilize REDCap’s "Project Setup" page steps and to place projects into Production status once they are ready to collect data. In Production status, changes cannot be made to data collection instruments directly. Rather, to make changes, the user must place the project into "Draft" status, where the changes are held separately until submitted. On submission, the REDCap software compares the drafted changes with those of the existing project. If the changes will delete or invalidate existing data, then the changes must be reviewed by a REDCap administrator.
Starting project status: Development
| Move to Production status | Changes needed? Move to Draft status
| → | If the changes do not affect the data, they will be approved automatically. |
| → | If the changes may affect the data, they will be reviewed by the REDCap administrator. |
The LSI REDCap instance is configured so that only changes that impact existing data will trigger a review. In the REDCap configuration User Settings, the option is set as shown:
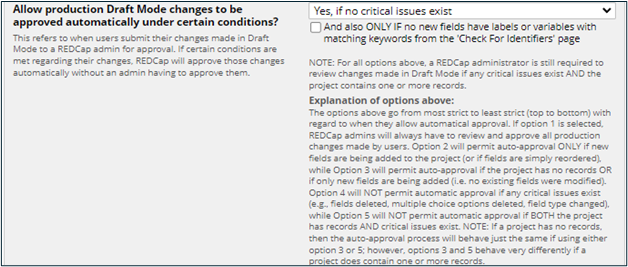
The available choices, from most restrictive to least restrictive, are:
- Never (always require an admin to approve changes)
- Yes, if no existing fields were modified
- Yes, if project has no records OR if has records and no existing fields were modified
- Yes, if no critical issues exist
- Yes, if project has no records OR if has records and no critical issues exist
Demonstration
Steps for handling a REDCap project change review
STEP 1: Review
When a review is triggered, REDCap sends a notification to the Administrators by email, with a link to the Project Modification Module for the affected project.
Drafted changes can be reviewed at any time, including prior to submission, on the Project Modification Module page:
https://data.lsi.ku.edu/redcap/redcap_v[current_version]/Design/project_modifications.php?pid=[project_id]
The example below shows a “potential critical issue” triggering a review by the REDCap Administrator.
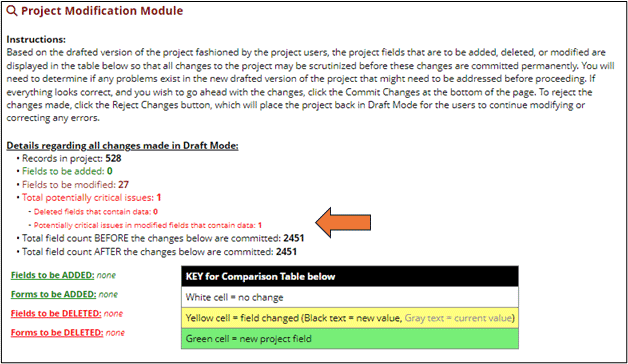
The Project Modification Module summarizes all changes made in Draft mode, and details fields to be added, deleted and modified. Fields added and modified are listed in a detail table, color coded to show all changes. Only modified and deleted fields need to be reviewed.
STEP 2: Modified fields
Modifying fields only triggers a review when the changes will affect existing data in the project. For example, removing a radio or checkbox option from a field, when the project has records with data in that field, will trigger a review, even if the radio or checkbox option was not selected in any of those records. Similarly, deleting a field with records that have data in that field will also trigger a review.
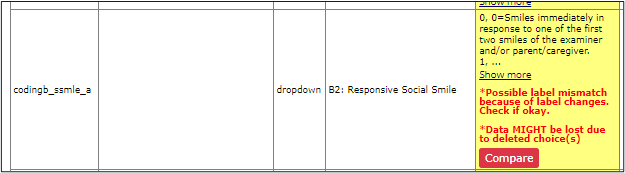
For fields being modified, use the “Compare” tool to review fields affected by changes:
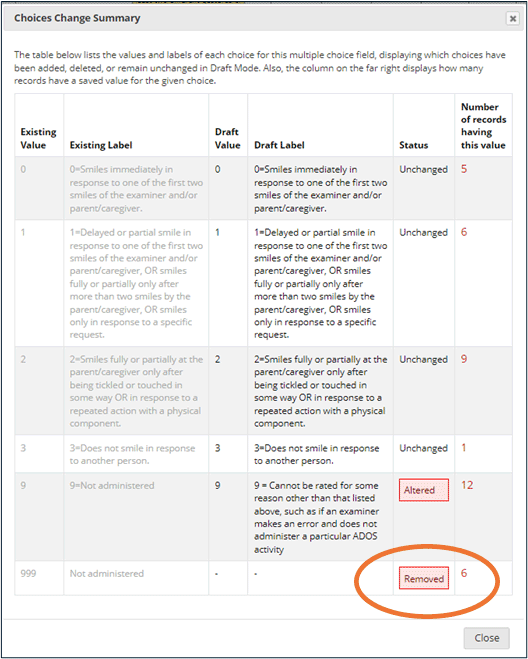
Review changes and potential lost data. The Compare table shows a summary of all data counts for values in that field. If no existing data are affected, that will clear in the table. In the example below, records affected by the option marked "Altered" need review due to the label change. The "Removed” option (999) will affect 6 records. In this case, the project team intended these to be re-coded as 9, but had missed updating these records.
STEP 3: Deleted fields
For deleted fields, confirm whether the data loss is acceptable. If not, consider other options:
- Could the fields be hidden using the @HIDDEN (or other) Action Tag?
- Could the fields be moved to a new instrument, and the entire instrument restricted under User Rights?
STEP 4: Use REDCap’s tools and features to investigate
When submitted changes trigger a review by the REDCap administrator, sometimes the project owners are not aware of how the changes will affect their data. The fact that the submitted Draft changes may cause data loss may come as a surprise. It is important to find and identify the affected data to make an informed decision about how to proceed.
Use the following features and tools of REDCap to review the affected data.
- Start with the Project Modification Module link, referenced above, for a summary of the Drafted changes.
- Use the project Codebook, for identifying variables and their instruments
- Use the Field finder to jump directly to the problem field:

This will take you to the instrument and the relevant details about the field: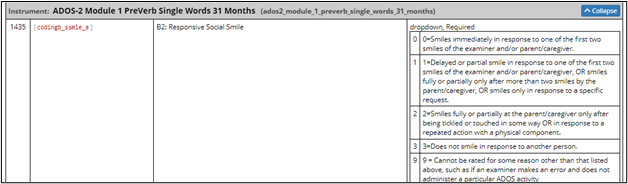
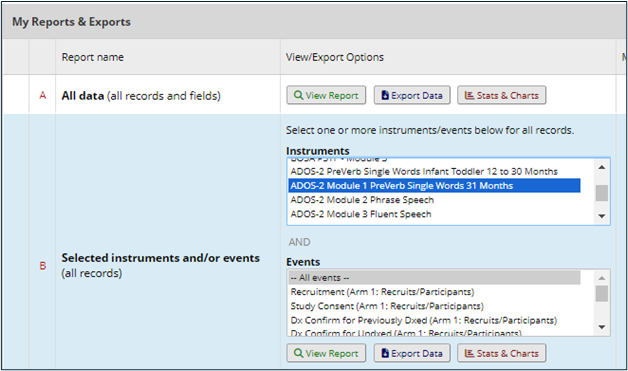
- Use the "Selected instruments" feature of Data Exports/Reports tool to quickly generate a report of affected data across all events for that instrument:
- Look for affected records to resolve issues. If necessary, use the Data Exports/Reports tool to create a new report that filters for those specific record and field values.
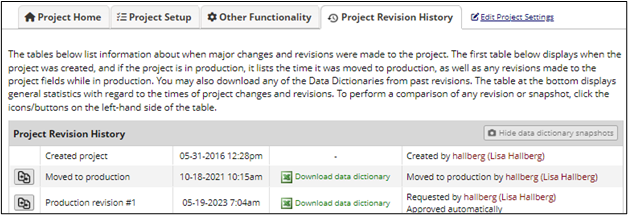
- Track ongoing changes in the Project Revision History:
STEP 5: Address the affected data and proceed
Depending on the Drafted changes to the project, and in the case where the changes will affect existing data, there are basically three options for how to proceed.
- Ignore: If there are no actual records affected (for example, a removed option is not used in any records in the project), or if it is acceptable to lose the data, then the warning can be ignored and the changes approved.
- Fix the affected data before the change: Once problem records are identified, change those records to no longer be affected by the drafted changes. Once updated, the Project Modification Module page should show no affected values in the changed fields.
- Fix the data outside of REDCap and import: Sometimes, the change requires the following steps:
- Export the record ID and affected fields as they exist prior to the change,
- Draft and approve the change to the project,
- Outside of REDCap, modify the exported data to reflect the new structure,
- Import the modified data to replace the old values using the Data Import Tool.
Fixing the existing data: an example
Sometimes structural changes to research instruments mean the data changes have to be handled outside of REDCap.
Consider the following example. If, in a project’s existing structure, a dropdown field’s choices are coded as 1 = "green" and 2 = "red", but it turns out that 1 and 2 should be reversed (2 = "green" and 1 = "red"), then the existing data need to be changed. In order to switch the values, you can either use a statistical tool to recode the column, or, using Excel, you could use a new column and calculate the correction using an IF statement:
=IF(B2="1", "2", IF(B2="1", "2", B2))
In other words, "if the value in cell B2 is 1, display 2, otherwise (if the value in cell B2 is 2, display 1, otherwise display the original value))". Providing the embedded "otherwise" condition ensures that only 1s and 2s are switched, without accidentally changing any other values that might be in the data. This formula should be copied and repeated for the entire dataset.
After saving these changed values to CSV file, they can be imported into the REDCap project using the Data Import Tool.